Wednesday, May 22, 2013

No, seriously, never leave our house.

I already shared my little crafty art addition to our entryway here, and I'm back to share another update to that space. 


Voila! While hunting through our favorite flea market, I found this little vintage print that just so happened to be 50% off. The sentiment is cute and obviously goes with our "Welcome to our house, please, never leave" message that we are apparently trying to convey to our guests.


If you can't read it, it says "Our home is just a stopping place for those who come this way. We're glad to see each smiling face, and which they all might stay."

I love the colors (the blue in the new print goes nicely with the blue frame next door), and the awesome vintage quality makes me feel happy inside. I also love that it not only fills up that space a bit more (the one frame on that wall felt a little lonely), but now our guests will have no doubts that if we had our way, we'd lock them up in our basement forever, hang out with them, like, all the time if we could.

Oops Count: Zero! Good confidence booster to know I can simply hang up a small frame without any missteps. A year ago I might not have been able to say that.

Tuesday, May 21, 2013

Finally We Can Stop Flashing the Neighbors

Yes, our bedroom has been curtainless since December.  When we moved in, our master bedroom came with some pretty nice, custom accordion blinds on the windows. No complaints until it came time to redecorate and we hit a snag when we realized the dark jade green blinds would not jive so well with our new color scheme. So when we started painting, we said goodbye to those blinds and due to the 6-month-and-counting process of finishing the bedroom, have had naked windows ever since.

Well, that's not entirely true.  We did improvise a curtain in our bay window just to help block the sun from shining directly in our faces in the morning...


That may or may not be a towel duct taped to the window. Don't hate.

So anyways, fast forward to now and we finally have made some progress and our windows are fully dressed. Getting to the final product has been a bit of a journey, however.  I've written and re-written this post a few times at this point, detailing all of the missteps along the way, but it ends up being insanely long. And I just have a feeling no one wants to spend 15 minutes reading about our friggin' curtains. So I'm going to abbreviate significantly. You're welcome. How 'bout just a quick list of all our OOPSIES and subsequent resolutions (and maybe a picture or two).

Conundrum #1: The curtains we fell in love with are super sheer, and therefore wouldn't have done much as far as blocking light or providing privacy. We solved this one by opting to hang blackout curtains behind the sheer curtains (other options included sewing some sort of liner to the back of the curtains, etc).

Conundrum #2: The first blackout curtains we brought home were a bizarre size and ended up looking like this:

 
Too small to cover the entire window. We solved this by returning them and buying a different brand that were actually a normal size (and ended up being much better quality overall). 

Conundrum #3: How to hang the two sets of curtains together. Toyed with sewing them together, as I mentioned above, but wanted to be able to just have the sheer curtains closed if we felt the need. So then our options were buying a double-rod set or finangling our own DIY version of a double-rod system. While shopping for a double-rod set, Phil emphatically decided he could DIY it himself, so we went that route. Fast forward a couple weeks, after we have finished hanging the two sets of rods, we are at the store and Phil sees a double-rod set and exclaims "WHAT? Those exist? We could have just bought one of those instead of dealing with creating the system ourselves?!" Phil's brain works in mysterious ways. Anyways, we ended up hanging a simple cafe rod for the blackout curtains.

 
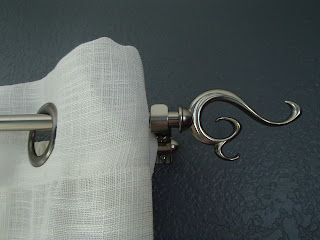
Followed by a larger, decorative curtain rod for the sheer panels. Luckily the hardware for each rod were the perfect size in relation to each other, so the decorative rod hung just in front of the cafe rod.

 
Then it was just a matter of popping the rods on and hanging the curtains!


As you can see, the rods nestle perfecly and you can barely see the cafe rod peeking out underneath the decorative rod.
 
Oh but if only this was the end of the Never-Ending Curtain Saga.
 
Condundrum #4: The thick, heavy blackout curtains did not slide easily on the cafe rod, so much so that it pushed the telescoping cafe rod out to it's max length everytime you tried to move the curtains, and also required much elbow grease to fully open the curtains. We tried to MacGuyver a solution using a rubber band and hot glue (the idea being to stop the rod from telescoping), but that worked for about a day. And even if the rod didn't telescope, it was still a huge pain to wrangle the blackout curtains open every day. Finally we decided to get curtain rod clips to attach the blackout curtain to the rod so that it would slide more easily.  This did the trick, and after a solid month or so of constant curtain snafoos, we were finally done with that project.  
 

And that being said, drumroll please....

 
View #1: Blackout curtains + decorative curtains closed.  Obviously they don't "blackout" the room entirely, but they keep enough light out that sleeping in can certainly occur.

 
View #2: Blackout curtains open, decorative curtains closed.


View #3: All curtains open. (The snow outside shows you how long I've been procrastinating posting this sucker)

Glorious, no? Oh, and I shouldn't ignore our other lil' window in the room.. basically just rinsed and repeated the entire process over there..


Naked window before (and yes our lamps hang out on the floor because we have yet to finish our nightstands - although those ARE in progress at this point. Just currently waiting to cover up a big OOPSIE of the awful paint choice we initially made).

 
Gussied up window after. (Excuse the poor photography on this one.) Oh and we have since added one tie-back on the right hand side of the window to hold these curtains open. It's a simple silver guy, not worth the time and effort to take a picture. Take this opportunity to exercise your imagination.


Same double rod system on this window too (but imagine current rod clips on the blackout guy).

Phew. Glad to have that one tackled.  Ashamed that my abbreviated version of this post is still insanely long. If you are still reading at this point, wow. Congrats. You have the endurance of a champion. Thanks for hanging in there.

Oops Count: Three sounds about right.

Lessons Learned: Too many to summarize here. I know more about the ins and outs and intracies of hanging curtains than I ever thought possible. I think all the lessons I learned are pretty well touched on above, though.


Monday, May 6, 2013

Our First Houseiversary

I'm in the dog house with my... house. Yes, I forgot our anniversary.  May 4th, our closing date, came and went this weekend without me thinking twice about the special day.  But I DID finally remember a day later, and here I am trying to make it up to my sweet, sweet house. Please forgive me, baby.

Anyway, I just felt it appropriate to commemorate 1 year passing by writing a blog post. I figure a good old fashioned summary of what we've done so far, and what we have yet to do, is a good way to look back and simultaneously feel proud of all the work we've done and ashamed at all the work we've yet to get to. Here we go.

CHECK! Stuff We Have Done So Far:
- Paint entire main floor (living room, kitchen, stairway, upstairs hallway, dining room, entryway, hallway, etc.)
- Refinish kitchen cabinets
- Furnish living room with new coffee table, tv stand and rug.
- Paint and furnish guest bedroom
- Paint and furnish guest bathroom
- Get rid of swing set in backyard
- Furnish sun room
- Misc. decorating in living room and kitchen.
- Paint master bedroom and bathroom
- Refinish master bathroom cabinets
- Paint bedroom furniture (dresser, armoire, nightstands - somewhat in progress)
- New blinds/curtains in kitchen, living room and master bedroom
- Insulate attic fan
- Scrape/paint/caulk siding that was warped/peeling/rotting to prevent further water damage.
- Start organizational/storage systems in garage and basement bedroom
- Start compost bin
- Other misc. little furnishing/decorating items not worth detailing

Wow. That does not feel like a lot. I sat there for a good minute wracking my brain for other stuff we've accomplished, because I really felt like we've done more.  I guess a lot of those things were big undertakings, so I shouldn't be too ashamed.

Our Current To-Do List: Stuff Yet to be Done
- Build and paint new bed for master bedroom
- Decorate master bedroom
- Finish painting/decorating master bathroom
- Decorate/furnish dining room (rug, curtains, new lighting, art)
- Build built-in bookcases & window seat in front sitting area/entryway
- Furnish sitting area with seating, table(s) and rug
- Create giant frame wall in front sitting area
- Continue decorating living room/entryway/stairway/upstairs hallway, etc.
- Repaint trim on main floor bright white (it's peeling and chipping in a lot of places and it's more of a creamy off-white than we want)
- Paint/furnish/decorate half-bath
- Clean out/organize garage (goal: fit both cars!!)
- Replace gravel pit in backyard (former base for swing set) with grass (and reconfigure sprinkler system as a result)
- Plant veggie garden in the raised garden bed
- Paint/furnish/organize "office" in one of the upstairs bedrooms
- Finish unpacking (yes we still have random stuff shoved into empty bedrooms that hasn't been unpacked yet. Oy.)
- Paint exterior of house
- Replace counter tops, sink, appliances and possibly cabinets(?) in kitchen
- (This one is for Phil) Replace concrete "slab" on west side of the house w/ more attractive stone and build built-in grill/outdoor kitchen system (I call bullshit on this one!)

That's about it. There are lots of other little projects around the house that I didn't figure are worth mentioning, but those are our big to-do's as it stands now.

So I guess our to-do list is quite longer than our "done" list, but I suppose that's how it goes. We knew going into it that it would be years upon years of constant updating to make the house exactly what we want, and given we both work full-time, are operating on a relatively tight budget, and both have a solid lazy streak, I guess this is about where we should be. Especially that alongside all of those little updates, we've also had to just keep up with general house-maintenance, like keeping up the yard, making small repairs here and there, etc. So all in all, one year later, our house is still standing and looking more and more like OUR house, so I'm calling it a successful first year.  It will be interesting to see what I have to say about the house this time next year.


So cheers to you, first house of hours, on our first houseiversary! How far we've come since one year ago when we first hung out, drinking mimosas out of plastic cups on our first day together. Our love has only grown deeper. Here's to another fantastic year of trying not to burn you down!